Maneubo
general usage
target motion analysis
Introduction
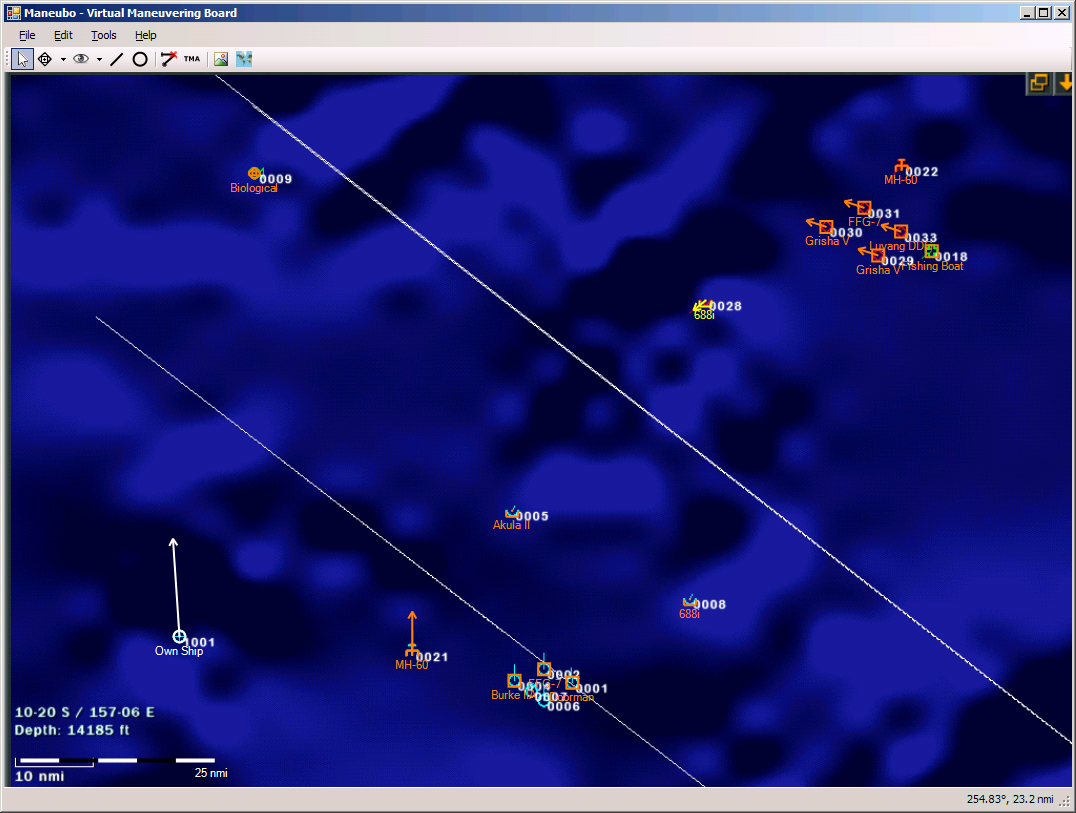
Maneubo is a program that was originally intended to provide a kind of virtual maneuvering board. A maneuvering board is a specialized chart used to plot the motions of craft, compute intercept and avoidance courses, etc. Maneubo does not provide a true maneuvering board, and in fact I consider them to be more or less obsolete, but Maneubo dispenses with the chart and automates the calculations, allowing you to do the same kinds of things much more conveniently.
Note: Circumstances have compelled me to release Maneubo before I considered it ready for the public eye, but it is still quite usable as it is. Because I haven't written a manual for it yet, I will add some brief usage notes further down on this page. I probably won't finish the program unless people ask me about it.
Features
- Infinite maneuvering board - The maneuvering board does not have a fixed size, but allows you to easily zoom and navigate on a scale from fractions of a meter to thousands of miles.
- Observations and waypoints - Unit waypoints and observations of one unit by another are explicitly represented on the map.
- Group units hierarchically - Units can be arranged in parent/child relationships to allow them to be moved, rotated, etc. as a group. (Movement as a group is currently not implemented.)
- Target Motion Analysis (TMA) - Observations of units can be analyzed to infer a target's position, speed, and course. This can be done manually, with an intuitive user interface, or automatically by Maneubo.
- Intercept calculations - Sophisticated intercept calculations are supported, allowing you to set intercept speed, time, angle on bow, and/or radius and have Maneubo compute the best course.
- Background images - An image of a map (or, if you wish, a real maneuvering board) can be imported, either from a file or directly from a clipboard or screenshot, allow you to plot on top of it. This is particularly helpful when using Maenubo in conjunction with a simulation, as you can import screenshots from the simulation and plot on them to perform TMA and help improve your strategy generally.
- Stopwatch - Maneubo has a stopwatch that can store an unlimited number of timestamps. It can be started and stopped, and timestamps can be stored, with global hotkeys that you can use from inside other applications. This is also helpful when using a simulation, when you want to collect data over several minutes before importing it into Maneubo in bulk.
- Customizable unit systems and color schemes - Supports various unit systems, allowing it to be used naturally for nautical and terrestrial maneuvering in metric and imperial units. Custom colors are especially useful to increase contrast against imported backgrounds.
- Unit shapes - Common unit shapes (submarines, planes, helicopters, land-based installations, etc.) help you better visualize the situation.
- Geographical measurements - Map projection allows you to place your maneuvering board at a position on the Earth and correlate the 2D map with geographical coordinates (i.e. longitude and latitude).
Usage Notes
These should hopefully serve any adventurous souls who decide to try the software before I write an actual manual.
- In addition to being able to select a shape (by left-clicking on it), Maneubo has the concept of a reference unit, which is the other unit logically involved in operations that involve multiple units. For instance, an intercept course is always calculated between the current reference unit and the selected unit. You can set the current reference unit by middle-clicking it or by right-clicking it and using the context menu. Only units can be the reference unit, not lines, circles, observations, or waypoints. By default, the current reference unit is drawn in red, the selected shape in blue, and other shapes in black or grey. (If the selected unit is also the reference unit, the color is a combination of the two - purple by default.) With many tools, useful information is shown in the status bar at the bottom-right corner, especially when there is a reference unit. (For instance, the distance and bearing from the reference unit may be shown.)
- Right-click shapes to access a context menu.
- With almost all tools, you can right-drag to scroll around the map, and use the mouse wheel to zoom. The exception is the tool to configure the background image, where right-dragging repositions the background image. In that case, you can middle-drag to scroll.
- Input boxes are rather flexible. You can enter a time as a number of minutes, "mm:ss", or "hh:mm:ss" where "hh", "mm", and "ss", represent hours, minutes, and seconds, respectively. You can enter a distance as a number followed by a unit (such as "m", "km", "mi", "nmi", etc). If no unit is specified, the default for the current unit system is assumed. Similarly, you can enter a speed as a number followed by a unit (such as "kn", "mph", "kmh", "m/s", etc), or just a number to use the default unit.
- The Pointer tool (hotkey P) is the tool to use when you just want to move things around. It has no special functionality.
- The Add Unit tool (hotkey U) allows you to add new units. Select the unit type with the dropdown arrow (hotkey F3). Left click to place a new unit. Left-clicking a unit will select it, but if you want to place one unit on top of another, you can hold Shift to force the placement.
- The Add Observation/Waypoint tool (hotkey O) allows you to place bearing observations, point observations, and waypoints. Select the type with the dropdown arrow (hotkey F4). Observations require a reference unit as well as a selected unit, and represent the reference unit observing the selected unit. A point observation simply states that the reference unit saw the selected unit at a specific position at a specific time. A bearing observation states that the reference unit observed the selected unit along a particular bearing. Waypoints, when defined, override a unit's velocity vector to define more complex movements, and there is an implicit waypoint at the unit's current position. You can left-click to add an observation or waypoint. A dialog will pop up asking for more information (in particular, the time of the observation or waypoint). You can add a '+' or '-' sign to the front of the time to indicate that the observation or waypoint took place that amount of time after or before the previous one. If you're adding a bearing observation, you can hold Ctrl while clicking. This will cause the bearing line to pass through that particular point at the indicated time, as opposed to simply being along the given bearing. If you want to place an observation on top of a another shape, you can hold Shift to force the placement and avoid selecting the other unit.
- The Add Line tool (hotkey L) and Add Circle tool (hotkey C) allow you to place lines and circles, respectively. Again, you can hold Shift while placing them to avoid selecting whatever is under the cursor, if you want to place shapes directly on top of each other.
- The Calculate Intercept tool (hotkey I) allows you to calculate an intercept course from the current reference unit to the selected unit. Simply click the selected unit and a dialog will pop up. You can fill in one or more boxes to customize the intercept course, and then either click "OK" to set the reference unit's vector or waypoint along the intercept course, or just click "Cancel" (or press Escape) after you've read the solution from the dialog. The quick intercept tool (hotkey Ctrl-I) opens an intercept form initialized with the currently selected units, if any, and also works if no units are selected (but you have to type in the data).
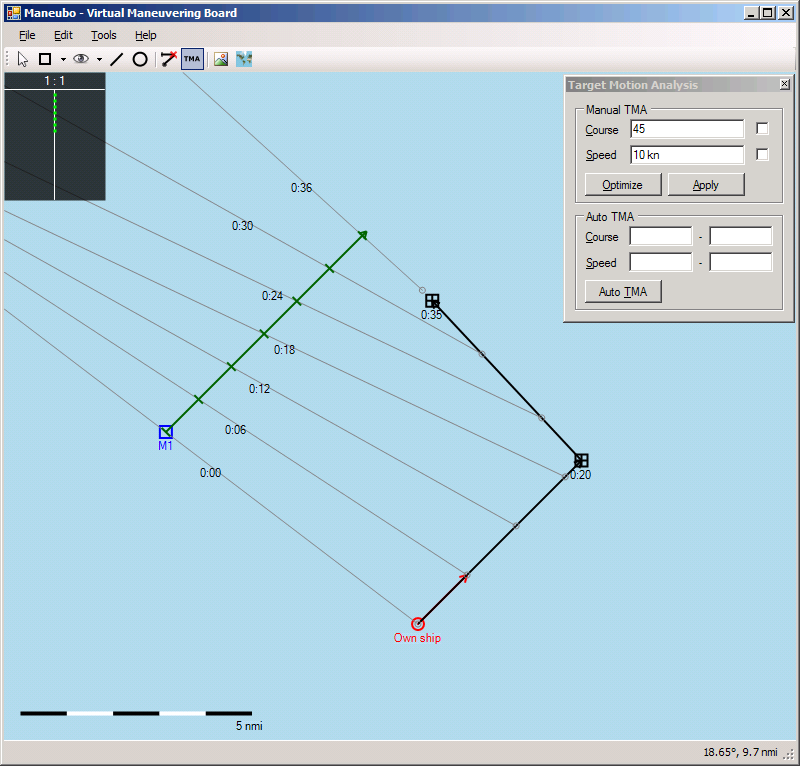
- The Target Motion Analysis tool (hotkey T) allows you to find TMA solutions (solutions for a unit's position, speed, and course given a set of observations). TMA assumes that the target is stationary or moving in a straight line. (I've written a bit about it here. The article is rather technical, but the introduction may be helpful.) To find a TMA solution for a unit, select the unit. A dialog box will appear, and green arrow representing the current solution will be drawn on the map. (The arrow may be very small at first — look in the center of the unit you selected.) If you have any observations of the unit, they will be shown. The goal is to align the crossticks on the green TMA bar with the observations and in doing so cause the dots in the dot stack (at the upper left) to form a straight line in the center. (See the above screenshot.) You can check either of the checkboxes to lock course or speed while you find the solution. Clicking "Optimize" will take your current solution and give the best solution nearby, respecting the course and speed you have locked, if any. (Usually it finds the best solution overall.) Clicking "Apply" sets the unit's movement vector to the TMA solution. The Auto TMA is a more sophisticated form of the Optimize feature. It allows you to enter a range of courses and speeds, not just a single course or speed. Entering one course uses that course exactly. Entering two courses uses the given range. Entering a speed in the left box uses that as the minimum speed, and entering a speed in the right box uses that as the maximum. To specify an exact speed, enter the same value in both boxes. Then click "Auto TMA" to find the best solution matching the given settings, in the sense of reducing the total error in the dot stack. When the TMA tool is activated, there are some additional shortcuts: Enter and Shift-A apply the current solution. Shift-O optimizes the current solution. Shift-T performs auto-TMA. Shift-C moves the keyboard focus to the course box, and Shift-S moves it to the speed box.
- The Setup Background Image tool allows you to configure the current background image. If you don't have a background image, you will first be prompted to add one. After that, there are two steps to configure it. First, you need to set up the scale of the image by left-dragging a line across the background image. (A red line will appear as you do this.) A dialog will pop up asking how much distance in real-world units that line represents. Entering a particular value will scale the background image to the correct size. For instance, if you import a background image of a map and the map contains a map scale in the corner, you can drag across the map scale to set up the correct scaling factor. Second, after the map is scaled properly, you should right-drag to position the background image. (If you would like to scroll the map at this time, you can middle-drag.) When everything is set up correctly, press Enter or Escape to accept the configuration.
- The Setup Map Projection tool will prompt you to click a point on your map. Doing so will ask you for the longitude and latitude of the point, and the map projection to use. You can use a number of formats to enter longitude and latitude: 150° 20' 30", 150-20.5, 150.34167, etc. including minus signs and directional suffixes. After you've set the map projection, you can see the longitude and latitude of the point under the cursor in the status bar.
- The stopwatch (hotkey Ctrl-W) allows you to time events and record an unlimited number of timestamps. Pressing Start will start the stopwatch. (When the stopwatch is open, you can use the global hotkey Alt-Ctrl-Shift-W, configurable in the program settings, to start/stop the stopwatch. You can do this from any program without switching to Maneubo first.) Clicking "Save" will record the current time as a timestamp in the list. The global hotkey Alt-Ctrl-W also does this whenever the stopwatch is open. Selecting a timestamp and clicking "Copy", or double-clicking a timestamp in the list, will copy it to the clipboard in a format that allows it to be pasted into dialog boxes (e.g. when adding observations or waypoints). Clicking "Clear" clears the list of saved timestamps.
Known Issues
- No real documentation or serious testing yet.
- Some UI niceties are missing, like icons and more shortcuts and drawing detailed information attached to items on the map.
- Setting up parent/child hierarchies between units is possible, but serves no useful purpose yet. I still have to think of what I'm going to use the relationships for. They aren't that important for Maneubo's primary purpose, so they're low priority.
- Switching tools while simultaneously dragging an object can cause the first tool to become confused. This is relatively straightforward to fix, but it's low priority.
- Known bugs in Microsoft's GDI+ runtime cause rare crashes during perfectly mundane operations. The only thing to do is work around them, but the workarounds are very ugly and I haven't done them yet.
Download
Executables: Maneubo.zip (283kb) Release 7 - released November 9th, 2020
Requirements
Before running Maneubo, you will need to install the Microsoft .NET Framework 3.5, if you don't have it already. If you use Windows 7 or later, you almost certainly already have it.
Changelog
Release 7 - released November 9, 2020
- Added support for additional clipboard image formats
- Allowed adding waypoints without a reference unit
Release 6 - released November 8, 2020
- Fixed some edge cases with negative time advancement in waypoints
- Fixed quick intercept form when changing target data
- If no unit is selected, waypoints will be added to the reference unit for convenience
- Added a different color for the reference unit when it's also the selected unit
Release 5 - released December 11, 2016
- Allowed negative times in waypoints and observations
- Time advancement no longer deletes passed waypoints, and updates observation times
- Time advancement remembers the previous time
- Initialized the quick intercept form from the selected units, and allowed it to update the reference unit vector
- Stored the selected and reference units in the save file
- Made Ctrl-W hide the stopwatch if the main form has focus and made Escape hide the stopwatch if the stopwatch has focus
Release 4 - released May 4, 2014
- Added the ability to perform quick intercept calculations by entering the target's position, course, and speed into the intercept dialog box rather than having to plot it first.
- Added a rudimentary ability to advance time. This will move units along their waypoints or vectors. (Waypoints that are passed will be deleted.) This is useful when you take many readings over time to compute a TMA solution. The TMA solution is for the beginning of the readings (i.e. at time=0), but you may want to advance time to place the target at its current position.
- Changed time input to accept non-integer times as a number of minutes (e.g. "2.5" means two and a half minutes). Also, xx:yy is now interpreted as mm:ss rather than hh:mm.
Release 3 - released September 29, 2011
- Fixed a problem that caused some form processing logic to be missed if you press Enter rather than clicking the OK button
Release 2 - released September 25, 2011
- Fixed a problem that caused a length in meters to be parsed incorrectly
Release 1 - released September 20, 2011
- Initial release
Source code
The source code is available here.